small bust:
plan:
- build the neck
- hollow it out
- score and slip
- add the head(already hollowed)
- add details
-

For my bust, I just wanted to get it out of the way. I know it might not look like it, but I actually tried and spent all class working on it. I found it a lot harder then I imagined it being even with it coming out like this. For me the hardest part was hollowing it out because I wanted it to look like it was not hollowed out. The facial features were also just as hard because your making a face out of clay. I'll give myself a little credit because making a bust is difficult and frustrating.
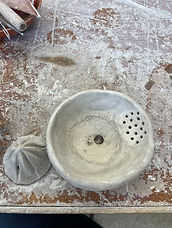
current artist: artiva_ceramic
plan:
- slabs for the bowl
- carve a hole in the bottom
- slab the juicer part
- carve holes on the side
- make the juicer part ribbed
- fire and do mid-fire glaze
For my artist inspired I attempted to make a juicer with a strainer on the side. Going into this I had no clue what to do, kinda just placing clay where I thought it should go. After each class I would come back to it and it would just non-stop crack. I finally got to a point where it got tiring just to keep fixing the cracks and waiting for it to dry so I slop bucketed it. Luckily I still had my choice from unit 5 to still do so I tried again. If I were to do something different I probably would have watched a tutorial.

mask or wall hanging:
plan:
- slab roll
- cut out the base
- cut out the attachment part
- put a hole
- add details
- fire

For my wall hanging I decided to make it like rapunzel themed. I kept it very simple only being white and pink but the flower reminded me of that movie. I was excited to see how it looked after coming out of the second firing until I saw like a black dot on it and it made me frustrated. I believe it came from the Kiln so its fine but I kinda just wish it was not there.
pueblo style coil vessel:
plan:
- coil build the bowl
- let dry to leather hard
- underglaze
- slop bucket
-
-
My pueblo style vessel was definently my most rushed honestly because I wanted to start unit 6 and mostly my final. I did not like how it turned out at all because I searched up what it was and painted the first thing I saw. My paint job was very sloppy and I didn't care about what it looked like. Therefore I did not fire it and just put it in the slop bucket right after because I wasn't gonna use it and found it unnecessary.
something useful:
plan:
-retry juicer
-watch tutorial
-use clay of the same texture
-take my time
After trying the first time I knew I had to do something different. I watched a bunch of tutorials and saw that it easier to just make a hole on the actual juicer part then leave a hole on the bottom. It still ended up being trial and error so I slowly started to give up again. I really wanted to make this for my mom for mothers day but I just got frustrated. I did end up slop bucketing it but not because it was cracking it was just because I did not like how it was ending out. If I could change one thing it would be my patience with these pieces and not rushing.
mugs for wellness center:
plan:
- make a pinch pot
- flatten and carve inside and out
- make everything even/proportional
- add details
- fire
- glaze

I really like my pufferfish mug because it turned out exactly how I imagined it would. The shape and design came together well. I am very grateful that its actually useful and there are no cracks. The color came out brighter than I imaginged, but I am not upset because I had to make it.
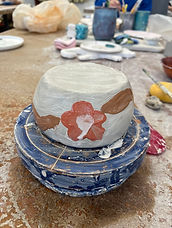
choice:
plan:
- slap roll
- make like a rolling thing
- put that on the outside/rim
- fold down for like coil affect
- fire
- glaze

In the beginning, I really did not like my plate. I first made it to be just a flat normal plate but it was too uneven. I then added a piece of clay on the edge of it and did like the rib thing. I wanted to make it into a specific food plate so I figured why not do my favorite, hot dogs. I really like everything after this step because the colors came out perfect given that I made them by mixing.